0%

In the fast-changing world of biotech, it's pretty important to really get a handle on the Centrifuge Diagram if we want to make the most of centrifugal microfluidics in different diagnostic tests. I recently came across a report from Grand View Research, and they’re saying the global point-of-care testing market could hit around $25.4 billion by 2025 — that’s a huge jump!

They've also pointed out that there have been some pretty exciting advances, especially in areas like blood clotting, biochemistry, and molecular testing. Here at Zhejiang Pushkang Biotechnology Co., Ltd., we’re always pushing the envelope by using our core tech to improve these vital diagnostic tools. Since we kicked things off in 2014, our goal has been focused on R&D, creating top-notch in vitro diagnostic (IVD) products, and helping them make a real difference in healthcare.

5 Best Practices for Understanding Centrifuge Diagram Functions

Getting a good grip on the Centrifuge Diagram isn’t just about understanding the tech — it actually helps us make our POCT products better, which ultimately means more accurate diagnoses and better outcomes for patients.

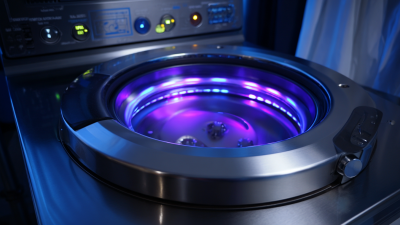
Understanding the Essential Components of Centrifuge Diagrams

Centrifuge diagrams are pretty dang important when it comes to making sure centrifuges run smoothly across different industries. If you really get a handle on the key parts of these diagrams—like the rotor setup, feed point, and discharge outlets—you'll find it so much easier to interpret what's going on. These elements play a big role in how well the separation works. Interestingly, I've read that tightening up these components can boost the overall efficiency of centrifuge processes by about 15%, which just shows how vital understanding this stuff really is.

On top of that, having a clear and understandable diagram is often the key to troubleshooting problems quickly and doing maintenance without a hitch. In fact, some studies show that nearly 30% of downtime in industrial settings is caused by folks misreading diagram symbols or functions—that’s a lot of lost time! So, it’s pretty clear that engineers and operators really need to get comfortable with reading these diagrams—knowing what each symbol means and how everything fits together. Put in the effort to learn this stuff, and you'll be able to catch issues faster, reduce mistakes, and keep things running at full speed, which really helps productivity and the bottom line.

5 Best Practices for Understanding Centrifuge Diagram Functions

Decoding the Functionality of Different Centrifuge Types

Getting a good grip on how different centrifuges work is pretty important if you're trying to keep things running smoothly in a lab, especially in biotech. Those centrifuge diagrams? They’re super handy tools—they show you exactly what's happening inside each model and point out what each part does. For example, in a lab focused on in vitro diagnostics, understanding how microfluidic centrifuges work can really boost the development of quick, at-home tests for things like blood clotting, biochemistry, or molecular diagnostics.

Lately, some exciting discoveries in biochemistry—especially about plant enzymes like 2,3-oxidosqualene cyclases—are shedding light on how different functions can sometimes trade off against each other. These insights can be pretty useful for companies like Zhejiang Pushkang Biotechnology Co., Ltd., helping them think about how adaptable and versatile their centrifuge designs need to be. When engineers get the chemical logic behind different centrifuge types and their parts, they're better equipped to innovate and improve their microfluidic platforms. That way, their IVD products can perform even better. Overall, it’s this constant back-and-forth between new biochemical discoveries and centrifuge tech that drives progress—making sure labs stay ahead in this fast-changing world.

Interpreting Speed and RCF in Centrifuge Diagrams

Getting a good grip on those centrifuge diagrams really matters if you want to interpret the speed and the relative centrifugal force (or RCF) correctly during your experiments. I mean, understanding how RPM (revolutions per minute) ties into RCF is pretty much the foundation for making sure your samples are separated just the way you want. RCF is actually the more important measure here because it directly reflects the force pushed on your samples — which can really make or break your biochemical or molecular biology results.

If you’re trying to convert RPM into RCF, it’s key to get familiar with the formula and how the diagram lays things out. The radius of your rotor is super important in this whole thing — the bigger the radius, the higher the RCF for a given RPM. Most centrifuge diagrams show this relationship pretty clearly, helping you see how different settings change the RCF levels. That way, you can tweak your centrifugation parameters based on what kind of sample you're working with and what kind of separation you need. Taking the time to really get what these diagrams are saying will definitely help you design better experiments and keep your results consistent over time.

Analyzing the Relationship Between Sample Volume and Diagram Layout

Getting a good grip on how sample volume and centrifuge diagram layout go hand in hand is pretty key when you're working in the lab. A clear, well-organized centrifuge diagram isn’t just for looks — it actually helps you see how your samples are spread out, which makes making decisions about your experiments a lot easier. If you pay close attention to the volume you're loading, you can tweak your spin protocols to get better results and overall, more reliable data.

**Tip 1:** Make sure your samples fit well within the rotor’s capacity. Overloading the rotor can mess with how well your samples separate and might give you skewed outcomes. So, always double-check that your sample volumes are within the recommended limits to keep things running smoothly.

**Tip 2:** When placing your samples in the centrifuge, think about symmetry. Placing them evenly around the rotor helps keep everything balanced, cuts down on vibrations, and really boosts the centrifuge’s performance. This even setup ensures the centrifugal force is distributed uniformly, which is crucial for good separation.

By keeping these tips in mind, you'll get way more out of your centrifuge diagrams and improve the overall quality of your experiments. Small adjustments like these can really make a difference in the reliability of your results, no kidding!

5 Best Practices for Understanding Centrifuge Diagram Functions - Analyzing the Relationship Between Sample Volume and Diagram Layout

Sample Type Sample Volume (mL) Centrifuge Speed (RPM) Diagram Layout Type Expected Separation Time (min)
Blood Sample 10 3000 Horizontal 15
Cell Culture 50 2500 Vertical 20
Urine Sample 20 3500 Swinging Bucket 10
Plasma 15 4000 Fixed Angle 12
Sediment 5 1500 Horizontal 25

Common Misconceptions About Centrifuge Diagram Functions

When it comes to centrifuge diagrams, a lot of folks have some misconceptions that can really trip them up when trying to operate or understand these machines. For example, many think that the diagrams only show the mechanical parts—like how the machine is built—missing out on the fact that they also highlight important stuff like speed, run time, and centrifugal force. It's pretty important to realize that these diagrams actually give you a sense of how the equipment should be used and what kind of results you can expect.

Here’s a little tip: always check the datasheet or manual that comes with your centrifuge. They usually have extra insights that help make sense of those diagrams and clarify what's going on in terms of operation and performance. And if something looks confusing or off, don’t hesitate to chat with an experienced tech or engineer—sometimes real-life applications can be a bit different from what the manuals say.

Another common misunderstanding is thinking all centrifuge diagrams are basically the same. Nope! The truth is, different models are built for different jobs—whether it’s for medical labs or big industrial stuff. Each diagram is tailored to serve its specific purpose, so understanding what kind of centrifuge you’re working with is key.

Here’s another tip: whenever you’re working with a new model, take some time to really get familiar with its specific diagram and features. Paying attention to the details can save you from mistakes and help you get the best results possible.

5 Best Practices for Understanding Centrifuge Diagram Functions

Tips for Mastering Centrifuge Diagrams in Laboratory Settings

When you're working in a lab, getting the hang of centrifuge diagrams is pretty crucial if you want to use these machines effectively. A good place to start is by familiarizing yourself with the main parts of the diagram—things like the rotor types, speed settings, and what they’re generally used for. Once you understand these basics, it becomes much easier to pick the right centrifuge for your specific needs and also helps keep everything safe by making sure all the parameters stay within safe limits.

Another handy tip is to pay close attention to the recommended protocols for different sample types. Different biological materials often need their own specific centrifugation conditions to get the best results. Taking the time to review these settings carefully, based on what kind of sample you’re working with, can really help you avoid common issues—like damaging your samples or not getting proper separation—that can happen if you use the wrong settings.

And don’t forget, staying updated on new centrifuge tech and any changes to the diagrams is a smart move. It keeps everyone in the lab informed and ensures your experiments are more efficient and accurate overall.

Unlocking Health Insights: The Role of Biochemistry Test Panels in Preventative Care and Disease Management

Biochemistry test panels are indispensable tools in preventative care and disease management, allowing for early detection of potential health issues before they become critical. By analyzing a simple blood sample, healthcare providers can gain significant insights into a patient’s biochemical status. These panels, which may include tests such as the Liver Function Panel, General Chemistry tests, and Electrolyte Tests, provide valuable information about the functionality of vital organs, electrolyte balance, and metabolic health.

The role of these panels extends beyond merely identifying the presence of disease; they are crucial in monitoring ongoing health conditions and evaluating the efficacy of treatments. For instance, the Glucose and Lipid Panel is essential for individuals managing diabetes and cardiovascular health, giving practitioners the data needed to adjust treatment plans as required. Furthermore, tests like the Myocardial Enzyme Panel can help in quickly diagnosing cardiac events, ensuring timely and appropriate medical intervention. By unlocking these health insights, biochemistry test panels empower both doctors and patients to engage more proactively in health management strategies, promoting a culture of health awareness and preventative care.

FAQS

: What are the primary components of centrifuge diagrams that need to be understood?

: The primary components include the rotor configuration, feed point, and discharge outlets, all of which influence separation efficiency.

How can optimizing centrifuge diagram components impact efficiency?

According to a report, optimizing these components can result in a 15% increase in overall efficiency of centrifuge processes.

Why is clarity in centrifuge diagrams important?

Clarity determines the success of troubleshooting and maintenance activities and can minimize errors that account for nearly 30% of operational downtime.

What role does RCF play in centrifuge diagrams?

RCF (relative centrifugal force) is a significant measurement related to the force exerted on samples during centrifugation, impacting the outcomes of experiments more than RPM alone.

How can one convert RPM to RCF accurately?

Familiarizing oneself with the conversion formula and the specifics of the centrifuge diagram is essential, particularly noting the radius of the rotor, as it directly influences RCF.

What should researchers consider regarding sample volume and centrifuge diagram layout?

Researchers should maintain a balance between sample volume and rotor capacity to avoid overloading, which can compromise separation efficiency.

How does sample arrangement affect centrifuge operation?

Arranging samples symmetrically in the rotor helps maintain balance and reduces vibrations, thereby improving the overall efficacy of centrifuge operations.

What is a key tip for optimizing spinning protocols?

By considering sample volumes and following best practices by utilizing centrifuge diagrams, researchers can optimize their spin protocols for better experimental outcomes.

How important is it for engineers and operators to understand diagram annotations?

Familiarity with diagram annotations allows them to quickly identify issues and apply effective solutions, minimizing errors and maximizing throughput.

What can be achieved by investing time in learning how to read centrifuge diagrams?

Learning to read these diagrams can minimize errors, enhance productivity, and improve profitability in laboratory settings.

Conclusion

Getting a solid grasp of how centrifuge diagrams work is a pretty big deal if you want your lab processes to run smoothly — especially in high-tech places like Zhejiang Pushkang Biotechnology Co., Ltd. I’m here to share five handy tips that shed light on the key parts of these diagrams. They help you understand the different types of centrifuges out there and what they’re typically used for. By looking at important details like speed and relative centrifugal force (or RCF), you can make smarter choices based on your sample sizes and how your diagrams are set up.

And, let’s be honest, there’s a lot of myths and misconceptions about what centrifuge diagrams actually do. So, I’ll clear that up to help you get better results in your lab work. With some expert advice on how to read and use these diagrams properly, anyone working with centrifuges — whether for research or diagnostics — can really level up their game. Especially when it comes to developing innovative IVD products, like those pushed forward by PUSHKANG with their cutting-edge centrifugal microfluidics. It’s all about making centrifuge tech work for you, more effectively and confidently.

Amelia

Amelia

Amelia is a dedicated marketing professional with a strong expertise in the field of in vitro diagnostics (IVD). Since joining PUSHKANG, a high-tech enterprise founded in 2014, she has played a crucial role in promoting the company's innovative solutions and expanding their market reach. With a......
Previous Comprehensive Guide to Understanding For In Vitro Diagnostic Use Only Regulations and Standards